Read the section below and watch Tutorial 01-Introduction followed by 02-ConfigurationUpdate and 03-Execution. In case of issues with your PyCharm environment you can check the 04-PycharmFix tutorial.
Introduction
Up until now you have been using an Arduino microcontroller to control your actuators (Leds, Servos, speakers) etc., hence your Sheikhabot. What if we want to connect our devices or our Sheikhabot to the internet to send information such as sensor data (temperature, attitude or position, etc.) or to receive information such as commands to perform certain actions using our actuators?, this is after all the basic notion behind Internet of Things, when you ask Alexa to switch on a light, the command is sent to microcontrollers connected to the internet which execute the function in question.
The Arduino could do that if it’s connected to your computer to use it as a hub, however alone it would not work as it does not have the capability to connect to the internet, through for example WiFi unless you equip it with a WiFi shield.
Instead of doing that, we are going to use the most diffused WiFi microcontroller which is at the so many devices connected to the internet. This microcontroller is the ESP8266.
The purpose of this exercise is to learn about the Internet of Things by connecting our Sheikhabot to the Internet with an ESP8266 microcontroller and control it by using an online AI and Machine Learning resource that is capable of reading facial features, position, emotions, and most of the things meaningful on our face. You’re going to explore how to:
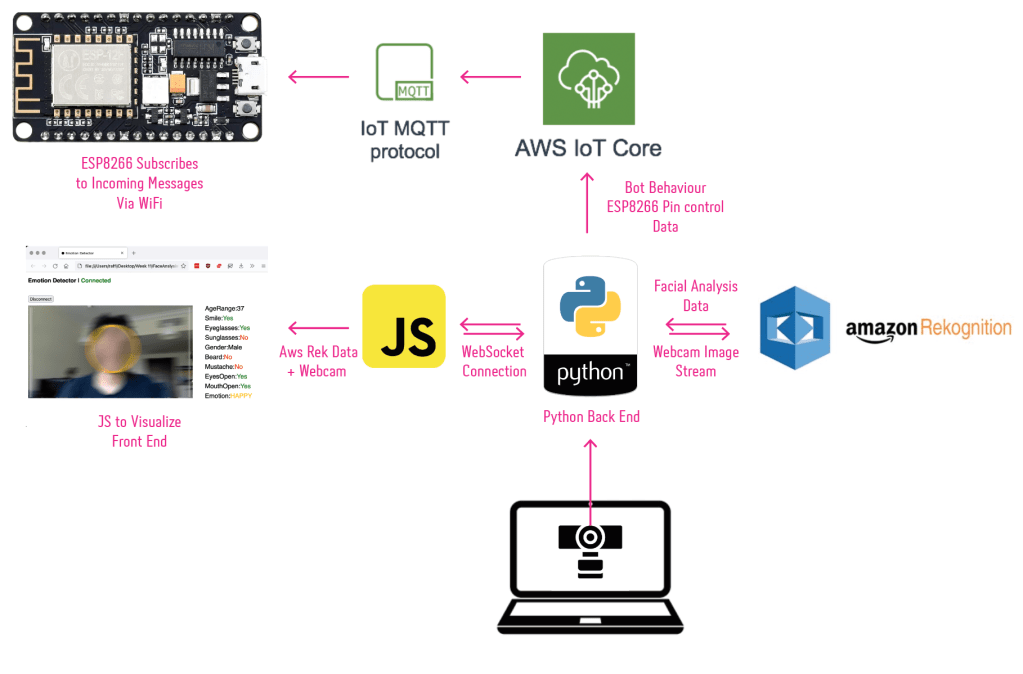
- Use a PythonBackEnd program to:
- Access your webcam
- Analyze a face using the Amazon AWS Rekognition Service
- Send the analysis response to a FrontEnd webpage to visualize the data and the webcam feedback
- Create a Sheikhabot behavior based on the AWS analysis response
- Send the behavior data to your ESP8266 through the the Amazon AWS IoT Core MQTT protocol
- Use a JavascriptFrontEnd program to:
- Receive the webcam image
- Receive The Amazon AWS Rekognition facial data
- Display the both the webcam image and the AWS data on the webpage
- Use the Arduino IDE to:
- Program your ESP8266 microcontroller
Assignment
Please watch the assignment tutorial which will take you through this exercise.
Configuration
Read the section below and watch 02-Configuration and 03-Execution.
- Download the resources from this link and extract them in a folder.
- Download and install PyCharm Community Edition and Visual Studio Code code editors.
- Create an Amazon AWS Free Tier account. The account is valid for 12 months and gives you limited access to some of the could services. CLOSE YOUR ACCOUNT ONCE FINISHED WITH THIS EXERCISE TO AVOID INCURRING ANY CHARGES IN THE FUTURE ONCE THE TRIAL PERIOD IS OVER, unless you want to keep using their services for your other projects.
- Create your ESP8266 Thing in AWS IoT Core with the accessing policy and download and rename your access certificates and store them inside FaceAnalysisBackEnd > certificates folder replacing the ones that are there . Make sure to keep these certificates private and do not share them anywhere else. If third parties abuse them you’ll incur charges on your AWS account.
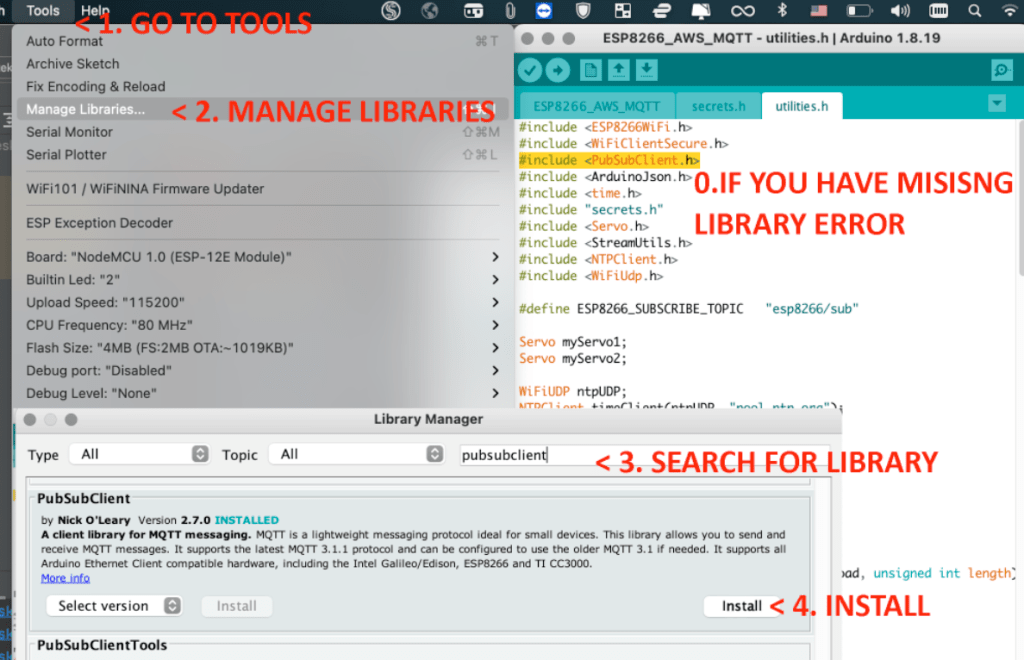
- Set-up your Arduino IDE to start programming an ESP8266 controller. Copy this link and Insert it in File > Preferences > Additional Boards Manager URLs Section, Install the ESP8266 from Tools > Board > Board Manager.
- Open ESP8266_AWS_MQTT.ino from the ESP8266_AWS_MQTT folder and insert your credentials in the secrets.h tab.
- Connect your ESP8266 to your computer and upload the code. Open the Serial Monitor and make sure the ESP8266 is configured and connected to the internet (check the serial monitor for messages WiFi connected and AWS IoT Connected! See Image Below )
- If you have missing libraries as you did in the previous exercise, install them per the instructions in the image below.
- If you can’t find your device in the port, change your USB cable to a thicker cable, some cables are just meant for charging and not for data transfer.
- IF YOU STILL CAN’T MANAGE TO CONNECT TO ESP8266 DO THIS INTRO TUTORIAL FIRST TO TEST , LIBRARY, CABLES AND CONNECTIVITY
- Create an IAM user in AWS console with AWS Rekognition and IoT Full access policies, copy the user key and secret code.
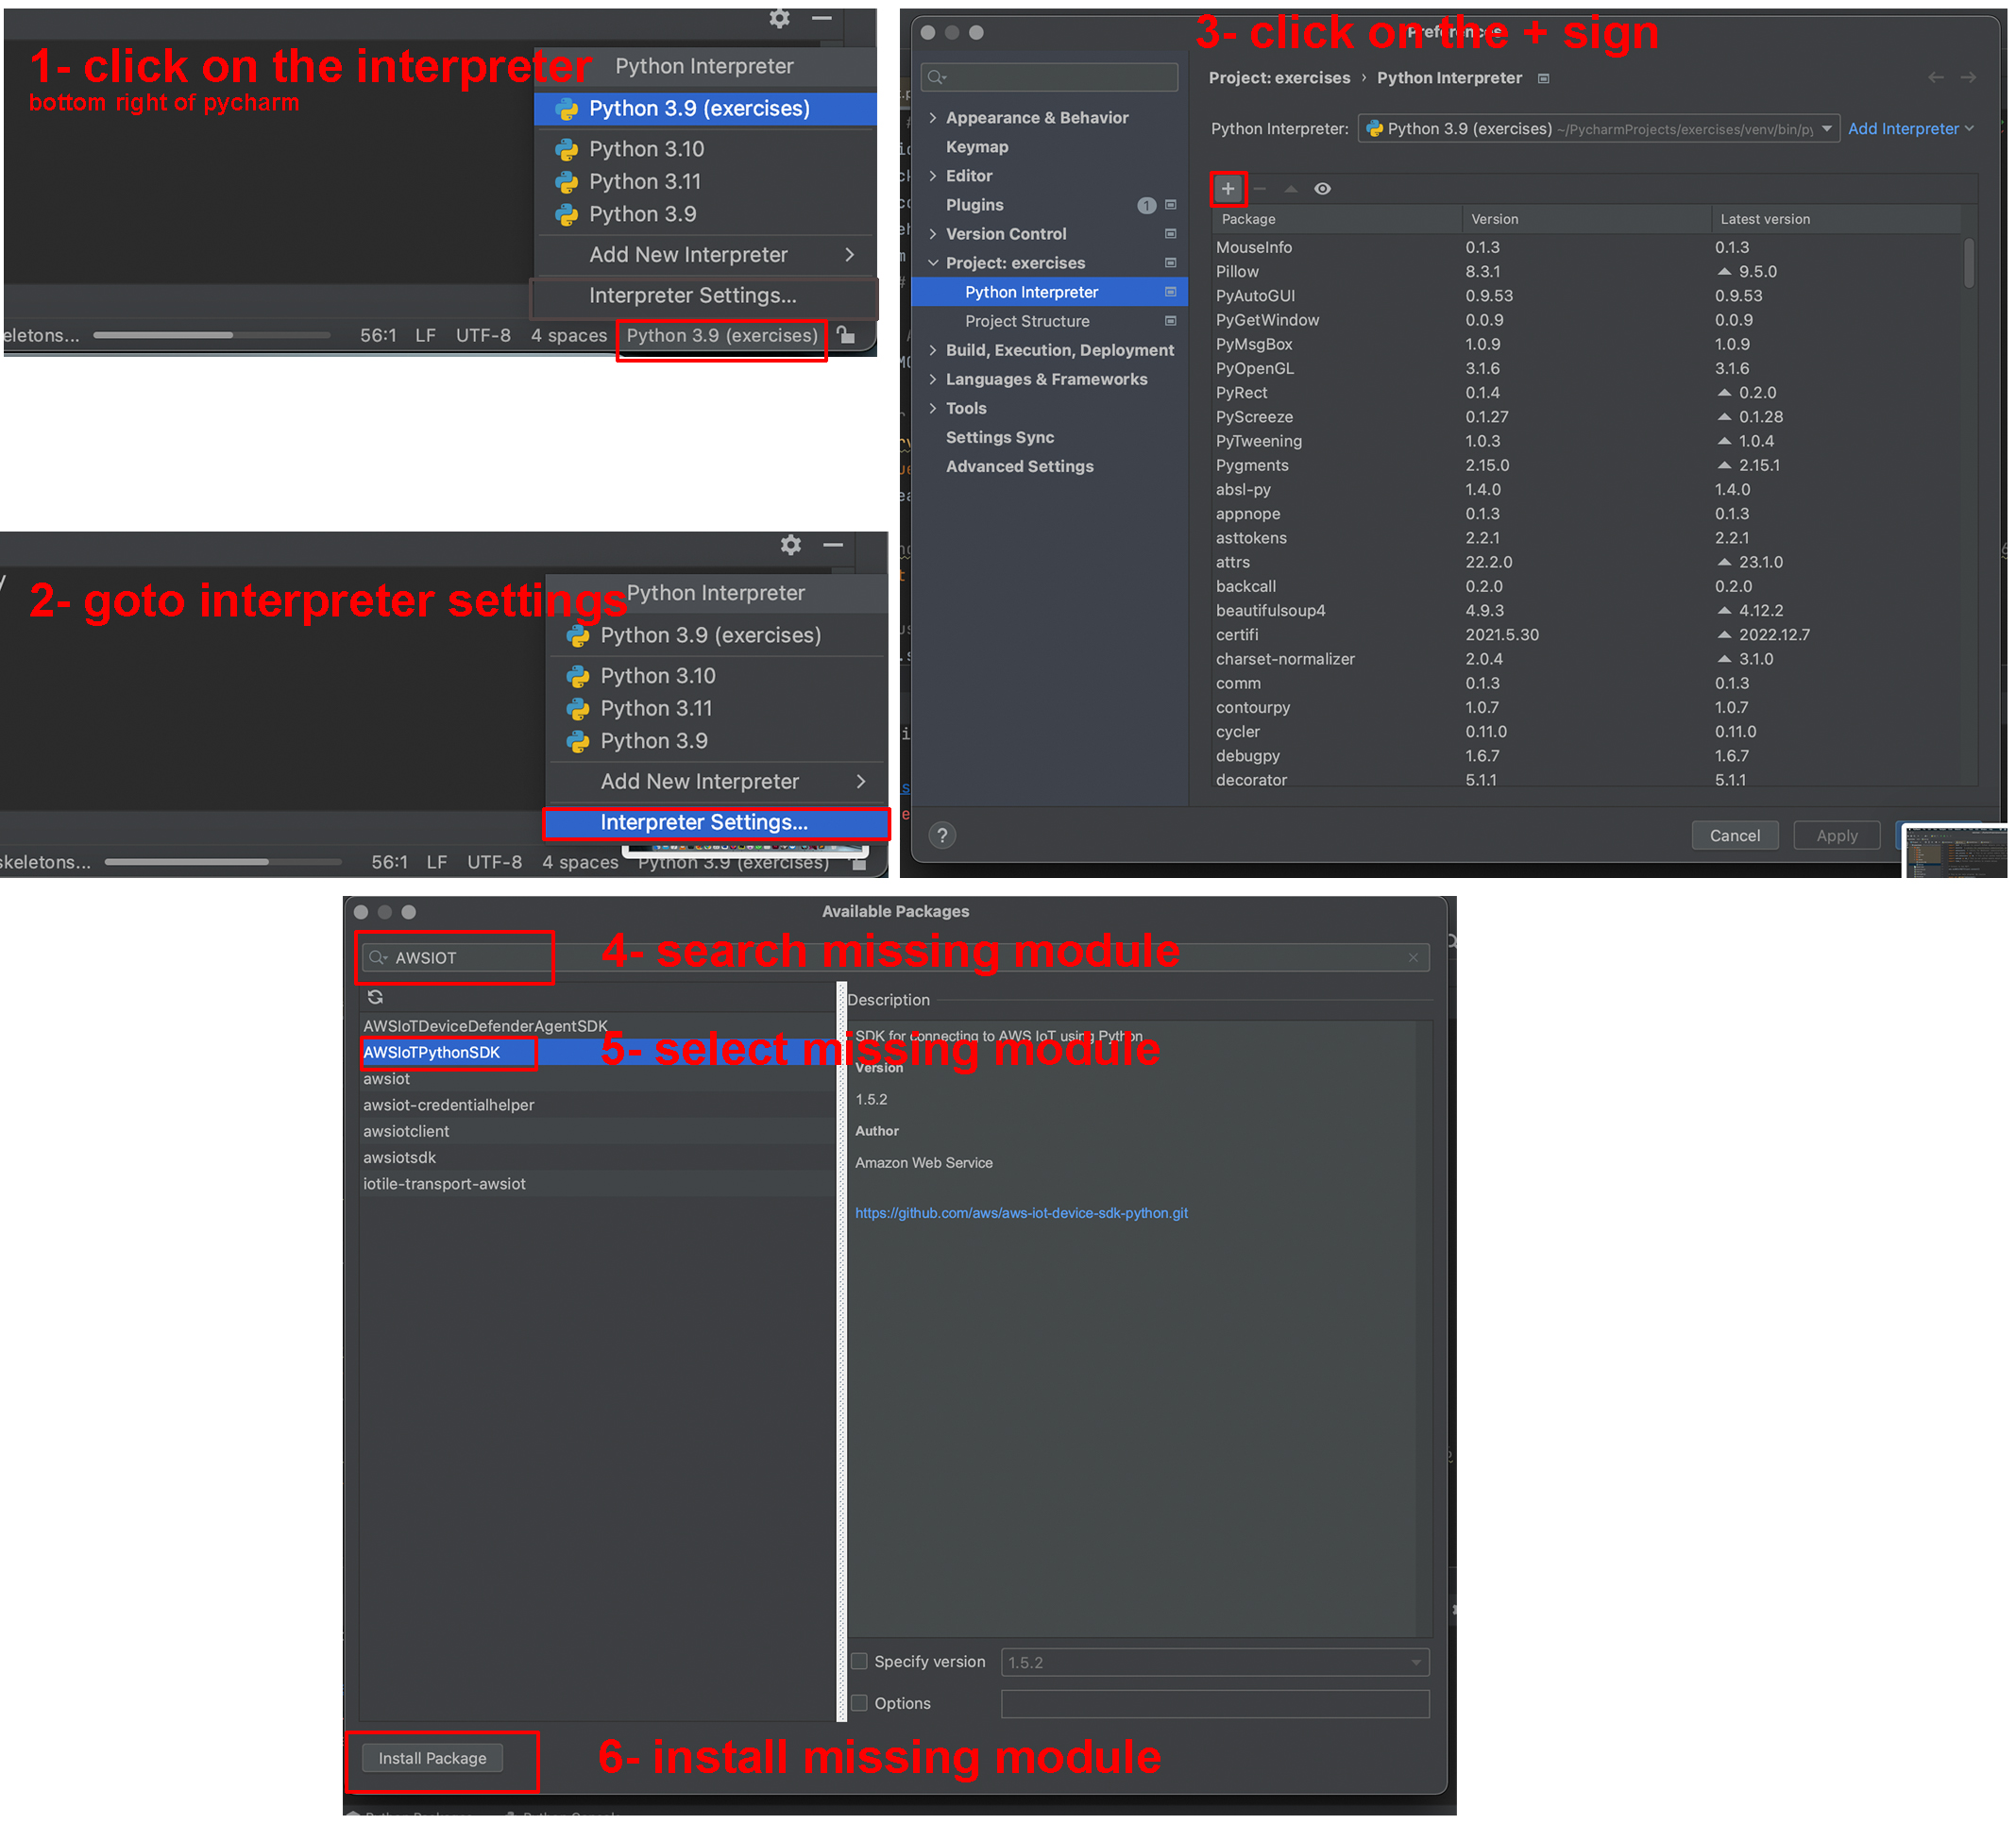
- Open FaceAnalysisBackEnd in PyCharm and insert the credentials you copied in the earlier step inside aws_access.py.
- Set up your Python Environment by adding a configuration from the bar above.
- Make sure you have installed all libraries in your pycharm environment else you’re gonna get “No Module Named XX” error. To install cv2 library just look for opencv-python.
- Run Your Back End and check for messages below.
- Open the index.html file from the FaceAnalysisFrontEnd folder, and connect, if everything is set-up properly you should see the face analysis data on the webpage. Once done stop the Back-End and prepare for the next step.
- That’s it! you have set-up your Back-End, Front-End and your ESP8266.
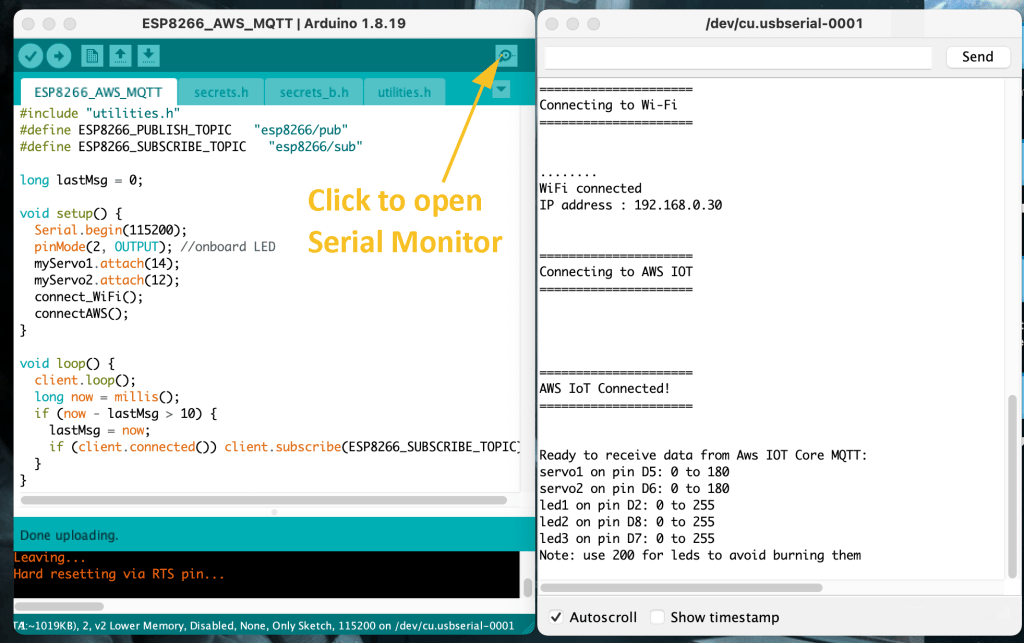
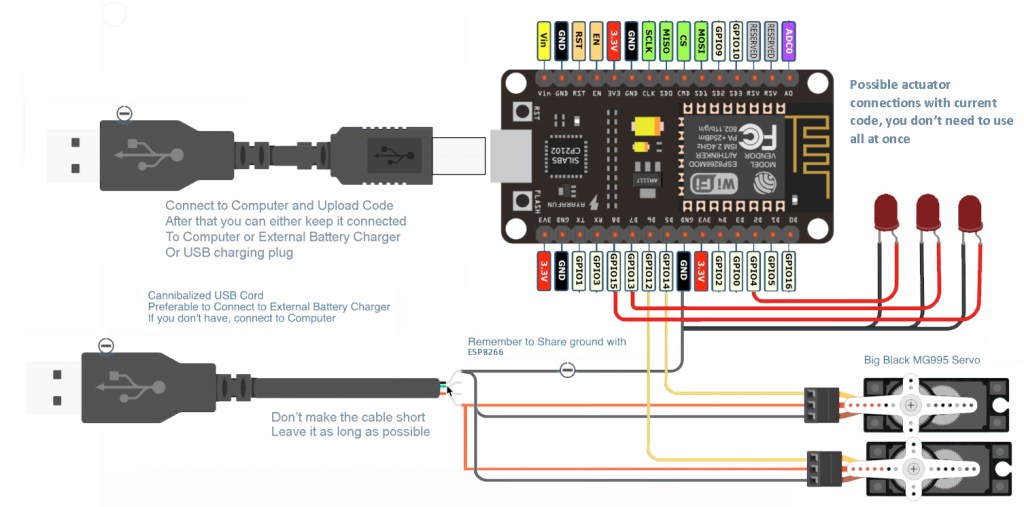
#servo1 is D5, servo2 is D6, led1 is D2, led2 is D8 and led3 is D7 These are the values that your ESP8266 can read
(servo1 and servo2 can take numeric values from 0 to 180 to control rotation angle)
led1, led2 and led3 take in numeric values that correspond to their intensity from 0 to 255. (ATTENTION: don’t use more than 200 to avoid burning your LEDs).Execution
Read the section below and watch 03-Execution.
As mentioned above, the goal of of this exercise is to connect our Sheikhabot to the Internet and control it remotely. In our case we’re going to use the powerful cloud based AWS Rekognition service to analyze our face and use that data to send instructions to our bot. Those instructions are going to be written in Python inside the FaceAnalysisBackEnd > bot_behaviour.py script. Let’s proceed.
- Watch and take notes from these two videos about 1. Python Data Types, Operators and 2. Conditionals, these are the core basic programming concepts available throughout all programming languages, the difference is usually in syntax. Once you test these concepts yourself in PyCharm you can proceed with your exercise. Remember to explore the notions beyond the links indicated above.
- Open bot_behaviour.py in PyCharm, read the instructions and configure your conditions to control the pins on ESP8266, and therefore to control your robot.
- Make sure the ESP8266 is configured and connected to the internet (check the serial monitor for messages WiFi connected and AWS IoT Connected! ). You can also connect some LEDs to test the system out in the next step.
- Use the AWS console to test the MQTT connection with your ESP8266.
- Start your Back-End server. Make sure you see the message Websocket server started in PyCharm without any errors messages, if not you need to configure your libraries and environment.
- Optional: In case you get errors of libraries and environment watch this additional video to fix it 04-PyCharmFix
- Start your Front-End Index.html
- Watch the Magic Happen!
- Once finished using it REMEMBER TO STOP THE BACK-END to avoid paying $$$
Objective
Define your behaviours inside behaviour.py.
- Step1 Define two or more behaviours using conditional statements (if/else) and logical operators (and/or).
- e.g 2 If my eyes are closed and I am Happy sheikhabot goes up and a red light turns on.
- e.g.2 If I am surprised bot moves and green light, else if I am happy, different movement yellow light, else no movement.
- Step2 Define two or more direct real-time behaviour tying facial position to servo or led values.
- use remap to tie x value to robot movement.
- use remap to tie y value to intensity of a led light.
- use face distance to control bot features.
- Step3 Define two or more behaviours combining Step1 and Step2.
- Bonus 5 to 10 points if you can use additional actuators other than servo and led (e.g. speaker), this might require programming the ESP8266 with additional code.
Submission
Publish the content below both on your blog before the next session for evaluation and prepare the files for Moodle for a later submission.
FOR EACH OF THE STEPS ABOVE PLEASE SUBMIT:
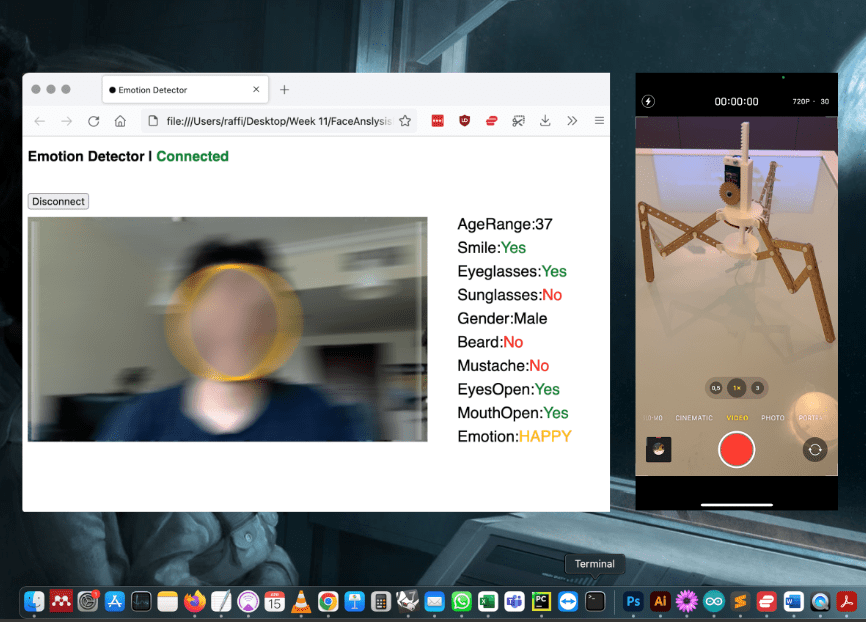
- Screen recording of the Front End reading your face and live stream from your phone camera streaming the movement of your robot at the same time. Create a zoom meeting on your computer and join from your phone to share your robot in real time using the rear camera of your phone.
- The block of code responsible for the the recorded behaviour explaining what it does with comments.
- TinkerCad / Illustrator diagram of your connections. (TinkerCad doesn’t have an ESP8266 so use images from TinkerCad and merge them in Adobe Illustrator to complete the diagram as in my example above.
- One video controlling your robot in an open space. Remember once the ESP is programmed it just requires power and a wifi connection (you can use a power bank and your mobile hotspot from your phone), this means that someone else can also operate your sheikhabot from another continent! Welcome to the Internet of Things
- Have Fun!
